Purple Mountain
DIY Supplies can be found in our Etsy shop :)
We are working on a Series of Videos showing how to use our products. Hopefully, the videos will inspire you!
Here is a video showing some of our supplies - this was done many years ago - wow have we grown :)
Here is a videos showing some simple bracelet ideas you can make - DIY.
I think I mentioned how I love to experiment with new things - here is a video showing some cool glitter jewelry creations. Sometimes I forget how beautiful these crafts are!!
You will see our 2 sided pendant in the video - how stunning!
DIY Supplies can be found in our Etsy Shop.
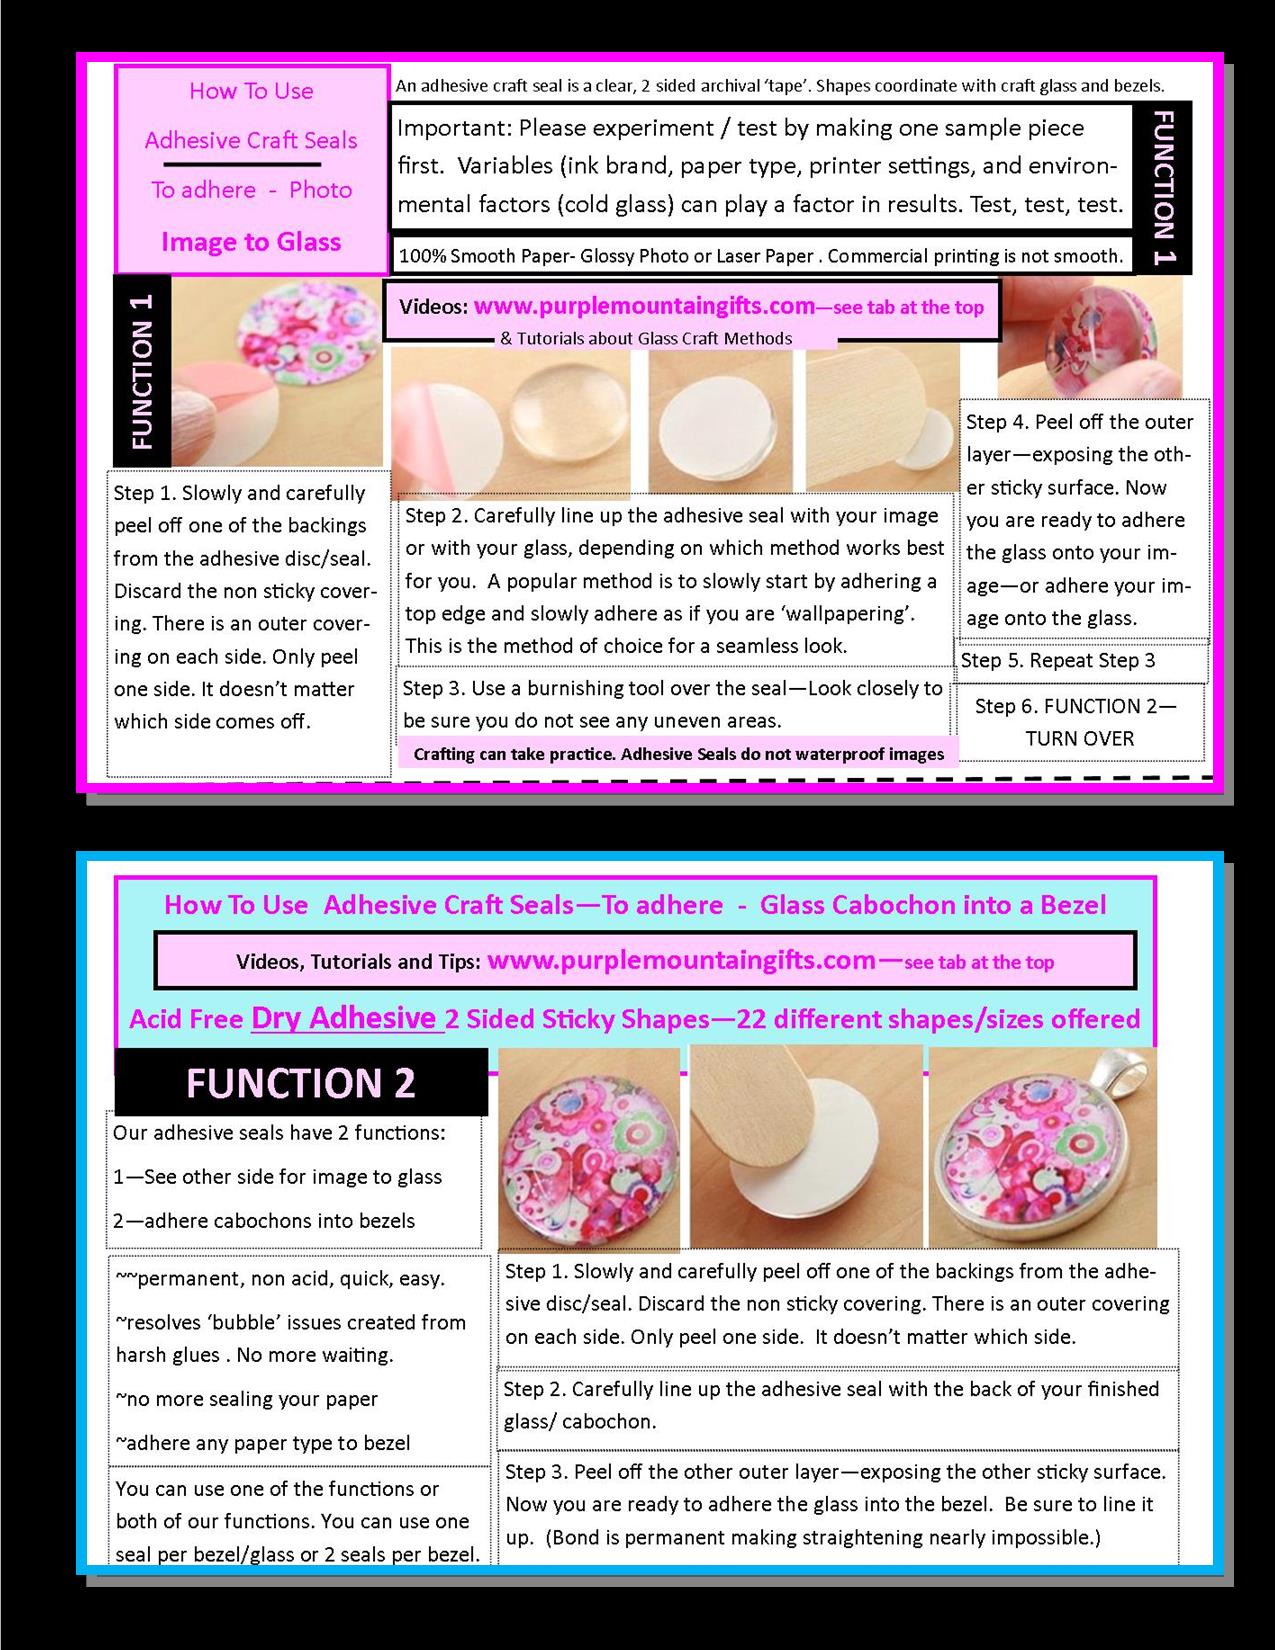
How to use Adhesive Craft Seals to make Earring Drop Charms and other Bezels using Glossy Photo Paper or Glossy Bright White Laser Paper. It is important to use glossy paper - 100% smooth - printed on a home printer. It is important to use the brand of paper made by your printer compay - (HP. Canon, Kodak) because the reason they make paper is to work best with their printers. If you use a different paper it may print and look fine in general, BUT when using he seals the ink MUST go on the paper lightly. If the ink is uneven or thick then the seals will not lay seamlessly and you will see glistening and small air pockets. Commercial printing also has problems. Commercial printers leave a texture when the ink goes down on the paper, regardless of the paper type, which can cause issues.
You can use a seal to adhere your image to the glass. You can also use a seal to adhere your finished glass cabochon to your bezel tray (in lieu of using jewelers glue.)
(I use Epson Premium Glossy Photo Paper. I also use Hammermill Color Laser Gloss 32 lb 94 Bright because Ricoh doesn't make it's own paper) I print using an Epson Artisan Printer or a Ricoh Color Laser. I have accumulated files and files of graphics and for some reason I prefer some printed on the laser and other on the ink jet. I know, I'm sort of a perfectionist :) Maybe you are, too. By the way, Epson is the only ink/ink jet printer/paper where ink will not run - in my experience. Ink does need to be sealed when using cardstock and glaze when using non-Epson products. If you are using seals you will not need to worry about sealing your ink because the seals are DRY ADHESIVE and Acid Free. They really are remarkable if you are using smooth paper printed on a home printer with paper and ink that coordinates by brand, if applicable.
IDEAS FOR USING CARD STOCK (INSTEAD OF GLOSSY PHOTO PAPER).
Glazes need texture for adhesion. This is important. Cardstock and textured paper provide the adhesion that smooth, glossy paper does not provide. So, if you are using a textured paper then you must use a glaze, not a seal. A seal is the opposite, you could say. A seal is like tape. Think about it like this - what is clear tape like on a textured drywall wall compared to a smooth window pane? It is virtually invisible on the window but on the wall I would guess that tape is not laying flat and smooth. Many people don't explain this critical element. Many crafters will experience so much frustration using glazes on photo paper when the glass just falls off or snaps off.
We have developed our own dimensional glaze - it is getting fabulous reviews.
We discontinued our glaze because I was repackaging our bulk glaze into smaller 2oz and 4 oz bottles as a courtesy to my customers. But due to safety and legal liability we decided to discontinue this home-made cost effective product packaging. I am so sorry the worries of liability have taken away so much of our entrepreneurial freedoms and small business ways.
More specific instructions on how I use the glaze can be found in the listing on Etsy through the link up above.
I tend to put glaze on my image about the size of a nickel and then position the glass onto it. But when I use Mod Podge I tend to 'paint' mod podge on the image and on the glass and then put the glass on top. I think I mentioned how I put my Mod Podge in a Nail Polish Bottle. I always suggest experimenting to find the method that works best for you. Mod Podge is thicker than Dimensional Glaze. I like both equally but I my selection choice is dependent on the thickness of the paper. I use the thinner Dimensional Glaze on THICKER cardstock and I use Mod Podge on THINNER cardstock. You can experiment and see what you prefer.
If you prefer to use card stock rather than glossy paper (I use Epson Presentation Paper) I recommend using our new Dimensional Glaze or Mod Podge. You can usually find Mod Podge locally but we sell it as a convenience. I like to put it into in a nail polish bottle. It is less messy that way :) We offer it in our shop on Etsy. There is a link to it if you scroll down this page.
It is very simple and the results are beautiful:
INSTRUCTIONS FOR USING DIMENSIONAL GLAZE OR MOD PODGE FOR GLASS CRAFTS:
Using this method, I print my graphic on card stock. I use Epson Presentation Paper which is a matte card stock. I use an Epson Artisan 837 Color Ink Jet Printer. I punch out my graphic/image with a punch or cut it out to fit the bezel tray I am using for my project. I show you how I rough cut and trim my glass in the top video on this page. Then I 'paint' on a moderate coating of Mod Podge onto the back/flat side of my glass. (We developed our Dimensional Glaze after I wrote this - Now I use it.) I take my graphic and position it onto the glass so I can see the image looking through the domed/top of the glass. I kind of slide my graphic around a bit to be sure there are no air bubbles or uncoated areas. Then I align my glass and graphic and I set the glass down on a table to dry. I usually put a piece of paper down to protect the surface but this is not a messy project and no glaze should seep out but it's fine if it does. I let it dry overnight but it is usually dry within 6-12 hours depending on how thick you paint on the Mod Podge. Once dry you may want to coat the back of your cardstock with a coating of Mod Podge or white glue, depending on your paper brand. The purpose of this is because when you adhere the finished glass cabochon into your bezel, if you use jeweler's glue, the glue may soak/seep through your paper and ruin your image. E6000 is a good, strong jewelers glue. Another option is to adhere the glass into the bezel with one of our adhesive seals. If you use a seal you will not need to coat the back of your cardstock.
As with all crafts, it is good to test your specific paper/ink/glue/bezel to be sure everything works perfectly for you before you do a mass production order. I would let the glass sit on the desk for a couple days before adhering to the bezel. Some paper/glue cure over as long as 72 hours. To be safe, I like to experiment for a week when I try new methods. I usually label my samples so I know what I did later on when I evaluate the results. The reason I suggest not gluing the glass into the bezel is because if something goes wrong you can soak/clean your glass and start over. You won't lose a bezel and a piece of glass if you are patient getting your method down first.
About those Nail Polish Bottles:)
I like to put my Mod Podge, Elmers, and other concoctions I mix up - I like to put fine glitter in my Glues - always experimenting to find the next new cool idea:) - in a nail polish bottle. No messy brushes or clean up :) We offer the nail polish bottle in our Etsy Shop, too. Some people love using them so much we also offer a 10 pack of nail polish bottles here. Supplies of bottles has been disruped due to covid. The bottles come from Italy. I may discontinue them but you can always use this idea and find nail polish bottles on Amazon, Ebay or online.
Happy Crafting!
Adhesive Seals - more info: